 |
Check out my spiffy poster worksheet I used with
built-in sentence frames to help model the worksheet for the center activity. All of my students were able to see wherever they were sitting on the rug! |
1. Being a student teacher in grad school you can imagine I wasn't really rolling in the dough. Remember, good lessons don't have to cost a lot of money. In thinking about ways to have students practice measuring I looked for nonstandard units that were already laying around in the classroom like crayons, markers, hexagon blocks, post-its, paper clips, and linker cubes. The great thing about being a student teacher is you have access to all the classroom resources and supplies. Make sure to ask your cooperating teacher if you can use his/her stuff though! I placed more than what was needed into plastic bags and numbered them. I then took different colored sentence strips, turned them around, cut them to the desired length, and numbered them as well so that when students measured with the corresponding unit, measurements were precise.
 |
What it cost me:
Crayons - $0
Markers - $0
Hexagon Blocks - $0
Post-its - $0
Paper Clips - $0
Linker Cubes - $0
Sentence Strips - $0
Students Learning How to Measure: Priceless
|
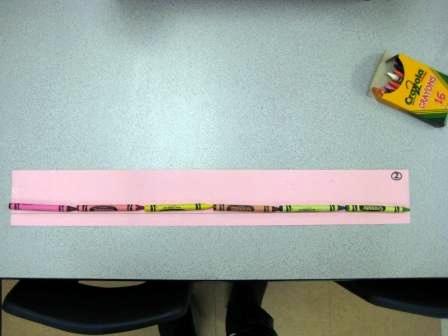 |
| Sample measuring station. |
2. I love centers. I find them to be especially effective at the primary levels because they give students structure and once the routine has been properly taught, students pretty much govern themselves and classroom management rarely becomes an issue. Another thing I realized about centers is that they are great for testing out a new lesson. This particular measuring lesson went on for a week (one row per day with no centers on Wednesday) and because only one row was working at a time, I could carefully observe and note what went well and what did not go as well. The very next day I made the modifications necessary based on the previous day's observations. For example, after the first rotation I noticed that the highs were dominating the lows by doing most of the measuring. When I reviewed the center the next day I explicitly told my students that they had to take turns doing the measuring so that everyone got a chance to measure. I repeated this process until it was Friday and voila! I had a near-perfect center activity by the end of the week. The next time I decide to teach this lesson I will be starting with a far superior lesson than the one I initially started with.
3. I created this poster worksheet to use as a visual aid while I modeled the activity. My students loved it! (I love how easily impressed kindergartners are). All I did was recreate the worksheet for the center on a big poster board and glued/taped on realia. During my student teaching, my CT had pointed out a few times that she couldn't see some of the materials I had used in my teaching. Up until she pointed it out, the thought hadn't really crossed my mind that the students sitting at the back of the rug might not have been able to see smaller print on worksheets and whatnot. I made sure to address that issue in this lesson.
 |
| I like to use visuals whenever possible to help my ELLs. |
4. After students measured with nonstandard units I had them compare lengths in the very last lesson. In reflecting on my lesson sequence I thought maybe I should have had students estimate measurements using the word about. What do you think? Would you have included a lesson on estimating measurement? If so, where would you place it in the lesson sequence? Would you teach it before or after this lesson?
As always, feedback and modifications are welcome. Keep your eyes peeled for the last lesson of the sequence. Happy teaching!
No comments:
Post a Comment